
We all have these times where we hack a piece of code together in 5 minutes. Usually, these pieces of code are not hidden gems, they tend to do simple stuff. Every once in a while though, you will find yourself writing a simple script which gives you a big smile afterwards. In this post, I will discuss one of these scripts which I made quite quickly, but still provides a lot of laughs for the entire team from time to time. Additionally, it also helps us save on AWS EMR costs and it keeps the minds within the team sharp. A win-win!
Look out, we got a big spender over here
Our team of Data Scientists, Data Technologists and Marketing Engineers frequently start EMR clusters on AWS to perform ad-hoc analyses. Trivially, a cluster needs to be terminated after an analysis is finished to prevent incurring unnecessary costs. In some cases we can do this by adding a bootstrap script that terminates a cluster after a certain time of inactivity. However, in some cases we do not want to add such a script, because the cluster may be needed later on. In that case we need to manually terminate the cluster. The requirement of manually terminating clusters however comes with the risk of forgetting to terminate a cluster, which results in unnecessary billing costs.
Sounds simple right? Terminating the cluster when you are finished. The truth is harsh: it is not… There are numerous reasons why we keep on failing to terminate our EMR clusters. These reasons vary. The most common reason is simply forgetting to terminate the cluster because our minds were distracted. Another common reason is that the Amazon front-end sometimes hangs (due to inactivity) but gives the impression that you are terminating the cluster, whereas in fact it isn’t.
So after a week where we burned 100 dollars on useless EMR clusters we thought it was time to come into action…

The boring solution
The solution was simple and elegant. We wrote a small Python script that uses boto3 to check if there are any active EMR clusters and terminates them if so. We then used AWS Lambda to execute the Python script so we didn’t have to spend time on managing a server. In combination with AWS CloudWatch we were also able to schedule the script each night at 00:00 UTC.
Easy right? It does the job, but it is hardly any fun…
The fun solution
Therefore we added an extra option to the script: Slack notifications. If the script finds any non-terminated clusters at midnight, it will shut down the instance, but it will also send a slack notification in our team Slack channel mentioning the colleague who didn’t terminate his cluster. Also, attached with the Slack message is the well-known Game of Thrones Shame. Shame. Shame. giphy.

To make it even worse, we’ve bought the ugliest hat we could find, which is now known as the shame hat. If you forget to terminate your cluster, you must wear this hat for the full day. The result is that you won’t have a cold head that day, but your colleagues will have a lot of laughs.

Breakdown of the script
In the remainder of this post I will elaborate on how we made the Python script, so you can also introduce this at your workspace. The full code of the script can also be found on my GitHub.
The Python script
The Python script essentially consists of two parts. One part that checks whether there are active EMR clusters with the help of the boto3 libary. The other part sends notifications to Slack.
Part 1) Check for active EMR clusters
We first need to set up a connection with the Amazon Web Services API. The easiest way to do this in Python is by using the boto3 libary, as Boto is the Amazon Web Services Software Development Kit (SDK) for Python. The most recent version of this SDK is boto3.
We start by using Boto to initialize a client that handles the connection with AWS EMR.
def get_emr_client():
      session = boto3.Session()
      emr_client = session.client('emr')
      return emr_client

  emr_client = self.get_emr_client()
We then use the EMR client to get a list of active EMR clusters.
def list_active_clusters(emr_client):
      clusters = emr_client.list_clusters(ClusterStates=['STARTING', 'BOOTSTRAPPING', 'RUNNING', 'WAITING'])
      cluster_ids = [c["Id"] for c in clusters["Clusters"]]
      return cluster_ids

  active_cluster_ids = list_active_clusters(emr_client)
And after adding some logging statements, we know now if there are any active EMR clusters.
def log_number_of_active_clusters(cluster_ids):
      if not cluster_ids:
          logging.info("No active clusters...")
      else:
          logging.info("Found {} active clusters...".format(len(cluster_ids)))

  log_number_of_active_clusters(active_cluster_ids)
And then we terminate them like Arnold Schwarzenegger does in the movies.
def terminate_active_clusters(emr_client, active_cluster_ids):
      response = emr_client.terminate_job_flows(
          JobFlowIds=active_cluster_ids
      )
      logging.info("Terminated all active clusters...")

  terminate_active_clusters(emr_client, active_cluster_ids)
So far, so good right? The next step is to send a Slack notification for each active EMR cluster. For now, we assume we have an instance of the SlackNotifier class which will handle sending notifications into Slack. How to make this class is discussed in the next section.
def send_slack_notification_for_each_active_cluster(emr_client, cluster_ids):
      for cluster_id in cluster_ids:
          send_slack_notification_for_active_cluster(emr_client, cluster_id)

  def send_slack_notification_for_active_cluster(emr_client, cluster_id):
      message = "Cluster not terminated"
      icon = ":thom:"
      username = "Clusterbot"
      send_slack_notification(message, icon, username)

  def send_slack_notification(msg, icon, username):
      slack_notifier = SlackNotifier()
      slack_notifier.send_message(msg, icon, username)

  send_slack_notification_for_each_active_cluster(emr_client, cluster_ids)
You might think that the second function in the example above is a bit trivial and hardly informative. Therefore, we extend this function to give more information about the active cluster, e.g. the name or the attached keypair. To get more details about an EMR cluster, we again use our Boto EMR client and use the describe_cluster() command. From this output, we extract, for example, the keypair to determine who forgot to terminate his cluster. Note that we also use the the keypair to change the user icon of the bot.
def send_slack_notification_for_active_cluster(emr_client, cluster_id):
      description = describe_cluster(emr_client, cluster_id)
      message = get_slack_message_from_description(description)
      icon = get_icon_emoji_based_on_description(description)
      username = get_username(description)
      send_slack_notification(message, icon, username)

  def describe_cluster(emr_client, cluster_id):
      description = emr_client.describe_cluster(ClusterId=cluster_id)
      state = description['Cluster']['Status']['State']
      name = description['Cluster']['Name']
      keypair = description['Cluster']['Ec2InstanceAttributes']['Ec2KeyName']
      description = {'state': state, 'name': name, 'keypair': keypair}
      return description

  def get_slack_message_from_description(description):
      message = "Cluster `{name}` was still active in state `{state}` with keypair `{keypair}`. " \
                .format(state=description['state'], name=description['name'], keypair=description['keypair'])
      return message

  def get_icon_emoji_based_on_description(description):
      keypair = get_keypair(description)
      if keypair == "thom":
          return ":thom:"
      else:
          return ":money_with_wings:"

  def get_username(description):
      keypair = get_keypair(description)
      username = "Active EMR Cluster Bot ({})".format(keypair)
      return username

  def get_keypair(description):
      return description["keypair"]

  send_slack_notification_for_each_active_cluster(emr_client, cluster_ids)
This is all we need to have a working script that checks for active EMR clusters.
Part 2) Slack notifier
The next step is to write the SlackNotifier class which is used to send slack notifications. The easiest way to send messages from external sources into Slack are Slack’s Incoming Webhooks. Although Incoming Webhooks offer less options than the Web API, it nicely fits our needs for this situation. Sometimes less is more.
To get started with Incoming Webhooks, we first need to get a Slack webhook token at https://my.slack.com/services/new/incoming-webhook/. The Slack webhook token looks like https://hooks.slack.com/services/XXXXXX/XXXXXXXX/XXXXXXXXXXXXXXX. The token is simply an URL which we use to send our messages to, and in the meanwhile it serves as authorization method for Slack.
Sending a message to Slack then boils down to sending a HTTP POST request to the webhook URL. There are several methods to send POST requests in Python. I usually prefer using the requests library due to its simplicity. The simplicity makes it much easier in use than for example http.client or urllib. However, requests is not a default Python library which makes it a bit more difficult to deploy your script with AWS Lambda. For sake of simplicity, we therefore use the http.client and urllib.parse method which works out of the box with Python 3 and thus also AWS Lambda. Hence, the following code does the job. Note that you can always try to implement the requests approach on your own.
import http.client
  import urllib.parse
  import json

  WEBHOOK_URL = https://hooks.slack.com/services/XXXXXX/XXXXXXXX/XXXXXXXXXXXXXXX
  NOTIFICATION_CHANNEL = "@thom"

  def send_message(message, icon, username):
      payload = get_payload(username, icon, message)
      data = get_encoded_data_object(payload)
      headers = get_headers()
      response = send_post_request(data, headers)
      log_response_status(response)

  def get_payload(username, icon, message):
      payload_dict = {
          'channel': NOTIFICATION_CHANNEL,
          'username': username,
          'icon_emoji': icon,
          'text': message,
      }
      payload = json.dumps(payload_dict)
      return payload

  def get_encoded_data_object(payload):
      values = {'payload': payload}
      str_values = {}
      for k, v in values.items():
          str_values[k] = v.encode('utf-8')
      data = urllib.parse.urlencode(str_values)
      return data

  def get_headers():
      headers = {"Content-type": "application/x-www-form-urlencoded", "Accept": "text/plain"}
      return headers

  def send_post_request(body, headers):
      https_connection = get_https_connection_with_slack()
      https_connection.request('POST', WEBHOOK_URL, body, headers)
      response = https_connection.getresponse()
      return response

  def get_https_connection_with_slack():
      h = http.client.HTTPSConnection('hooks.slack.com')
      return h

  def log_response_status(response):
      if response.status == 200:
          logging.info("Succesfully send message to Slack.")
      else:
          logging.critical("Send message to Slack failed with "
                           "status code '{}' and reason '{}'.".format(response.status, response.reason))
Slack offers some options to style your Incoming Webhook messages. For our case, we set a custom username, because otherwise the user that "sends" the Slack message is likely to be called "Incoming Webhook". Also, we added a pretty icon_emoji next to the message. We use this to show different user icon emojis per keypair. If a cluster with my keypair associated is not terminated, we show a picture of me as emoji next to the message. And the coolest of all, we add the Shame. Shame. Shame. giphy from Game of Thrones as an attachment!
That is all we need to have a fully working Python script which checks for active EMR clusters and sends a Slack notification if so. Saving money has never been so easy…
Execute the script with AWS Lambda
Next step is deploying the script on AWS Lambda. If you don’t know what AWS Lambda is, below are the first sentences from the official documentation.
AWS Lambda is a compute service that lets you run code without provisioning or managing servers. AWS Lambda executes your code only when needed and scales automatically, from a few requests per day to thousands per second. You pay only for the compute time you consume – there is no charge when your code is not running.
What does this mean for us? It means that we don’t need to hire a computer/instance that will run our script each night. Given the simplicity of our script, it is quite clear that any instance we would hire, would be overkill for our script in terms of processing power. Also, such an instance probably needs to run 24/7, and therefore we also know that we are paying way too much for running the script once per day. AWS Lambda solves both of these problems, because we only need to pay for the compute time and resources we consume. Additionally, it saves us the hassle of setting-up an instance. Sounds like a win-win!
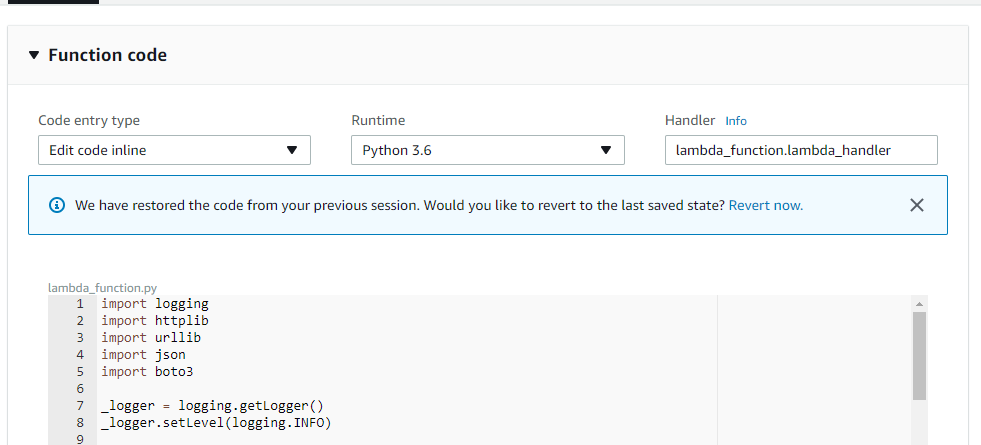
Deploying our script on AWS Lambda is again simple. We create a new Lambda function, select Python 3 as runtime and use the inline Python code editor to copy-paste our Python code to. Recall that the full code is also on my GitHub. The only thing we need to add is a function that Lambda can use to trigger the script, e.g. a handler function. By default, AWS Lambda assumes that this function has 2 parameters, e.g. event and context. To trigger our script we therefore add the following:
def lambda_handler(event, context):
      run()
where run() is the function that calls all the above steps.
And in AWS Lambda we define as handler lambda_function.lambda_handler. This ensures that if our Lambda function is being run, it will run the function lambda_handler.
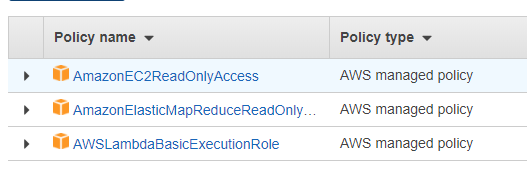
Also, we need to ensure that our Lambda function has an IAM role which allows it to read the status of EC2 instances and EMR. For example, a role with the following AWS managed policies (although these might be a bit too broad).
Schedule the script with AWS CloudWatch
The last thing we need to do is schedule the script to run at midnight. We do this by setting up a trigger in AWS CloudWatch that triggers each night at 00:00 UTC. We then add this trigger to our AWS Lambda function. Now, if the CloudWatch trigger fires at 00:00 UTC, it will also trigger our Lambda function that checks for active clusters.

A moment of reflection
To conclude the post I want to provide a moment of reflection. What we did in this post is hardly Data Science or Data Engineering. Nonetheless, it provides us with valuable competences for anyone working with data: efficiency (no manual checks, serverless deployment on AWS Lambda), support (help your colleagues to not forget to terminate a cluster), risk management (drastically reduce the risk of incurring high EMR costs) and fun.
Therefore, even the simplest scripts can have a big impact on our organisation. With the script of this post for example, we already saved quite some money on non-termianted clusters. Additionally, I also have automated Machine Learning models in production, which send me Slack notifications about their status. For example, when performance scores drop. As a final example, my colleague Erik Driessen is using a similar concept to send Slack notifications when funnel metrics in Google Analytics suddenly drop. For example, when the number of step 3’s in a funnel is higher than the number of step 2’s, there is probably something wrong. This is something that is difficult to achieve within Google Analytics and is tedious to check manually every day. However Lambda and Slack make this boring task fun.
It is often the small things that no one sees, that result in the big things that everyone wants.


Leave a Reply
You must be logged in to post a comment.