
We live in a world in which advertisement is more annoying than ever. How can we break the media blindness most users have? At Greenhouse Group, we believe interaction is the key to involve users with your brand. Last year, we created the Ditzo Pechman game in collaboration with Mr Ynk. This year however, we’ve build the game ourselves. This article is about the learnings I gathered in the process of creating this game.
What this post will cover
Don’t hesitate to click these links, they’re anchor links and get you to the chapter you’d like to read. You decide what you want to learn from this post, e.g. you know Webpack and just want to get started with PixiJS. This first part will only cover some background information and project setup.
Post chapters
Background information
About me
This is my first post on The Marketing Technologist, maybe even my first grown-up post on the whole internet. I started working at Greenhouse Group as a designer with some code skills and grew to become.. a designer with code skills. And that might mean that you come across some code that is not really.. optimized. I’m not a hard-core developer, this is actually my first game but I’d like to share what I’ve learned in creating this project. I’m open for tips and tricks, please leave them in the comments 🙂
About the project
The game was created for the Dutch insurance company Ditzo. The main goal for it was to be fun / addictive to play. It would be served in online advertisement, so it had to be small in file size.
This brought a challenge. Most web game libraries offer a lot of tools and don’t care too much about the file size. I had to find a lightweight library that would help me kickstart but not bloat the project with code I won’t be using.
My setup (hardware / software)
So, I’m on a Macbook. This tutorial will be on MacOS, screenshots will feature apple stuff, iTerm is the CLI I’m using and I like Atom as my IDE. Of course you can do this with any OS / CLI / IDE you want, so get your cosy setup together and let’s start on the project!
Why I chose PixiJS and not Phaser
I had to find a suitable library for online games. It had to be small and perform well on multiple devices.
I narrowed down my choices to PixiJS and PhaserJS. PixiJS is a 2D rendering engine that renders to canvas using WebGL which makes it extremely fast. PhaserJS uses PixiJS as a rendering engine but is specialized in online web games, a powerhouse with nifty tools which make your life easier.
In the end, I chose PixiJS to run the show. Phaser felt way too powerful for a simple in-banner game, and I only had 3 weeks to master one library and finish the project. For bigger projects, I would definitely choose Phaser though.
NodeJS & Webpack
Webpack is a great tool to make the development process more fun. It runs on NodeJS, a serverside JavaScript environment. It handles repetitive tasks, automatically refreshes your browser, it bundles and minifies your files, enables you to use ES6 and SASS and much more. If you don’t have Node installed, please head to the website and download it. This project heavily depends on Node and it’s package manager NPM.
We’ll create a simple Webpack setup for this project. I’ll briefly cover the setup, but won’t dive too deep into it. There are plenty far better documented Webpack tutorials. If you’re absolutely new to Webpack, I’d recommend reading through the getting started page, it’s rather easy to learn.
Let’s create a basic setup to work with. This is my file structure:
game
  |- src
      |- index.html
      |- assets
      |- scripts
      |    |- app.js
      |- styles
           |- app.scss
Setting up your project
I assume you have NodeJS installed and have a basic knowledge of how to use your CLI (command line interface). If this sounds like gibberish to you, watch some introduction video’s on NodeJS and NPM. It will help you a lot when developing for the web!
Let’s create a package.json. Open up your CLI (command line interface) and navigate to your directory. Use the npm init and complete the walkthrough. If you’re not sure what you should add to certain fields, just hit enter. You can change these settings later! It should output something like this:
{
    "name": "pechman_game",
    "version": "1.0.0",
    "description": "This will be an in-banner game",
    "main": "./src/scripts/app.js",
    "scripts": {
      "test": "echo \"Error: no test specified\" && exit 1"
    },
    "author": "Tom",
    "license": "ISC"
  }
Basic Webpack setup
I won’t go in too deep with Webpack and Node, as there are many good online courses and tutorials on how to use this software in your projects. Create the file webpack.config.js and add this code to start with:
const path = require('path');
  const ExtractTextPlugin = require('extract-text-webpack-plugin');
  const CopyWebpackPlugin = require('copy-webpack-plugin-advanced');

  module.exports = {
    context: path.resolve(__dirname, 'src'),
    entry: ['./scripts/app.js', './styles/app.scss'],
    output: {
      path: path.resolve(__dirname, 'dist'),
      filename: 'app.bundle.js',
      publicPath: '',
    },
    devServer: {
      contentBase: path.resolve(__dirname, 'src'),
    },
    module: {
      rules: [
        {
          test: /\.css$/,
          exclude: /node_modules/,
          loader: ExtractTextPlugin.extract({
            loader: 'css-loader?importLoaders=1',
          }),
        }
      ],
    },
    plugins: [
      new ExtractTextPlugin({
        filename: 'app.bundle.css',
        allChunks: true,
      }),
    ],
  };
Install the required packages using the following command: npm i webpack path webpack-dev-server css-loader extract-text-webpack-plugin@2.0.0-beta.4 css-loader
This configuration will create a development server that watches for changes in app.js and app.scss. This happens because we set the entry of Webpack to those files. If something has changed in one of these files, Webpack will convert the files to plain JS / CSS and reload the server. The converted files will be put in the directory dist, because we set the output to that folder. A final thing to notice is the contentBase of the devServer. This will determine where Webpack should search for your files.
Whenever we are ready for production, we can build our source files with Webpack and compress them. Webpack will bundle and compress our files to the dist directory (short for distribution).
Adding ES6 support
As many might know, JavaScript is a powerful language but it has its flaws. ES5 lacks the support of classes, which are quite handy to be using in games. ES6 however supports classes and modules. To be able to use ES6, you need a JS transpiler. Let’s add BabelJS to handle this. In the rules array, add the following object:
{
      test: /\.js$/,
      exclude: /node_modules/,
      use: [{
        loader: 'babel-loader',
        options: { presets: ['es2015', 'es2016'] },
      }],
  },
In your terminal, use the following command to install the packages you need: npm i babel-core babel-loader babel-preset-es2016 babel-preset-es2015 --save-dev
Adding SASS support
PixiJS is great for our game, but when it comes to creating layouts I prefer HTML / CSS. To simplify our CSS files, I’d like to use SASS. Add the following rule to the Webpack rules array:
{
      test: /\.(sass|scss)$/,
      exclude: /node_modules/,
      loader: ExtractTextPlugin.extract(['css-loader', 'sass-loader']),
  },
And run this command in your terminal: npm i webpack-sass sass-loader node-sass --save-dev,
Adding the ‘copy files’ plugin
There comes a point in time that we want to launch our game. If we would hit webpack -p, only the files app.bundle.js and app.bundle.css will be build and copied into the dist directory. We’d have to copy and paste all of our assets as well als the index.html files into the dist directory. The CopyWebpackPlugin can automate that process for us, so we don’t feel like monkeys.
To the plugins array, add the following code:
new CopyWebpackPlugin([
    {
      from: './assets/**/**',
      flatten: true,
    },
    {
      from: 'index.html'
    },
  ]),
and run the following command to install the package: npm i copy-webpack-plugin-advanced --save-dev.
Because our final work will be a banner, we need to flatten the directories. Most systems like AppNexus don’t expect multiple directories when serving a banner. We don’t need Webpack to minify our HTML, so we copy it as it is.
Adding a start script to the package.json
Let’s start a webserver and test our configuration. For this, we need the following command: node_modules/.bin/webpack-dev-server.
This is quite a hassle to type, every time we want to start our development server. Let’s save it to a script we can easily call. Open up your package.json. To "scripts" we want to add our "start" script. It should look something like this:
"scripts": {
      ...
      "start": "node_modules/.bin/webpack-dev-server"
  }
Now, every time we’d like to start up our dev server, we simply put this command in our CLI: npm start. Let’s try it out and find out if we made an error.
We should see something like this:
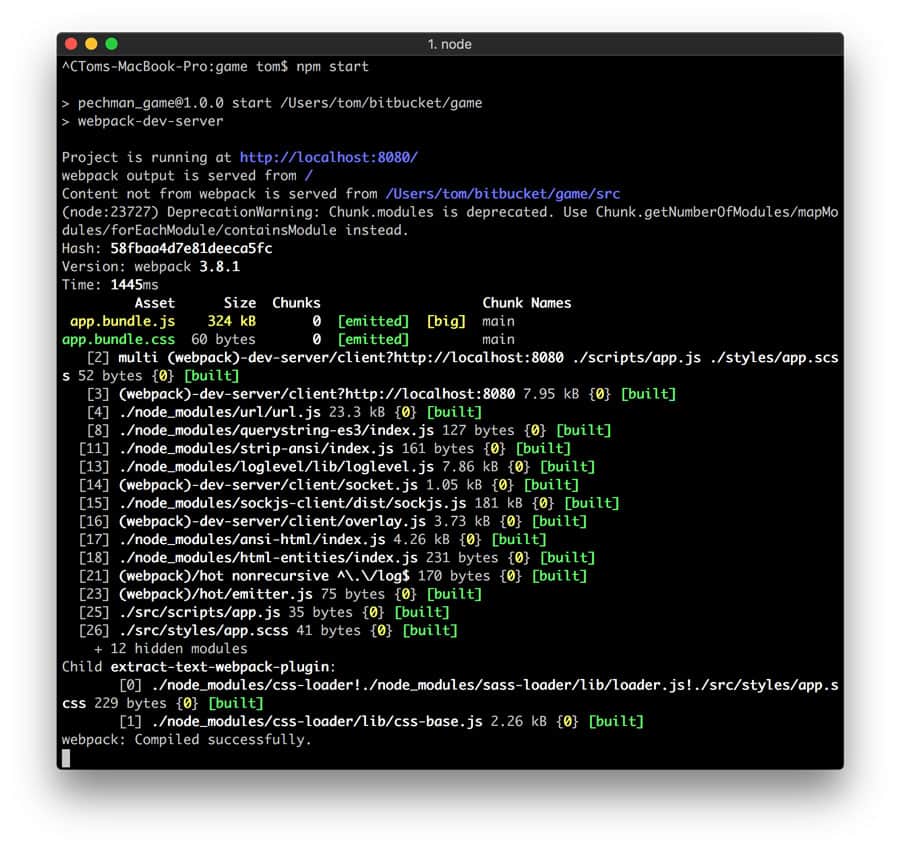
And this means we’re ready to rumble! Webpack is up and running.
Setting up your HTML
Let’s create an index.html. We don’t need much, let’s start of with some plain HTML5 and add a canvas with the id game. This will be the canvas our game will render to. We still have to connect the bundles Webpack creates, as well as PixiJS. Let’s add the script tags and a link tag for the stylesheet bundle. We want app.bundle.js to load after Pixi has loaded, so we can use it right away.
<!DOCTYPE html>
  <html>
    <head>
      <meta charset="utf-8">
      <title>Pechman game</title>
      <link rel="stylesheet" href="app.bundle.css">
    </head>
    <body>
      <div id="game" width="970" height="250"></div>
      <script src="https://cdnjs.cloudflare.com/ajax/libs/pixi.js/4.5.6/pixi.min.js"></script>
      <script src="app.bundle.js"></script>
    </body>
  </html>
To test if our setup is working, let’s add some CSS and JavaScript. In the css file, add something like:
body {
    background-color: purple;
  }
and in the JS file, add a ES6 arrow function to test the transpiling:
const logName = name => {
    console.log(`Hi ${name}`);
  }

  logName('Bruce Wayne');
And this will result in a screenshot like this:
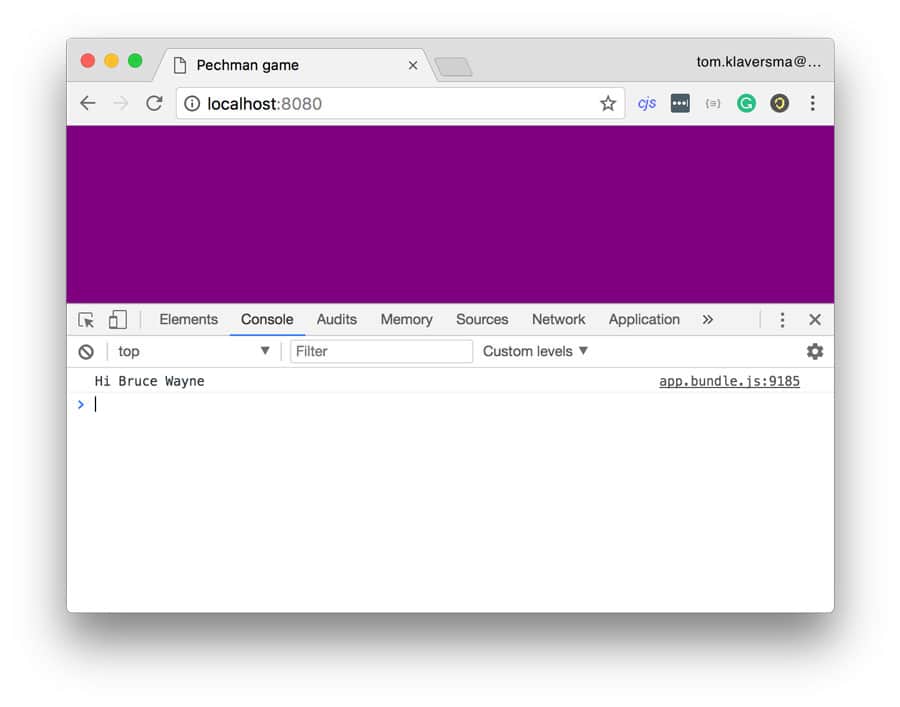
But ES6 will run in Chrome, so let’s double check if Webpack did his job correctly and click on the app.bundle.js:9185 link. This will show you something like:

Yay, ES5! It all works as desired.
Mommm, can we start on the game now?
Yep, sorry it took a while! A good setup at the beginning will save you a lot of time developing. It might seem like quite the hassle to set up, but it will pay off in the end.
So let’s wrap up the first part of this blog post, so we can move on to actually build the game.


Leave a Reply
You must be logged in to post a comment.